I made the Kitty Hat and I thought why not a puppy for the
boys. Of course this could also be done in a variety of different colour's and will also work for a girl. This free pattern is written in child size and toddler size but you could also find another beanie pattern and add the ears etc. I have included instructions for spirals as well as the ties. You could also add braids but personally I hate the time they take and I think these look just as cute.
Showing posts with label boys. Show all posts
Showing posts with label boys. Show all posts
Wednesday, 23 January 2013
Thursday, 27 December 2012
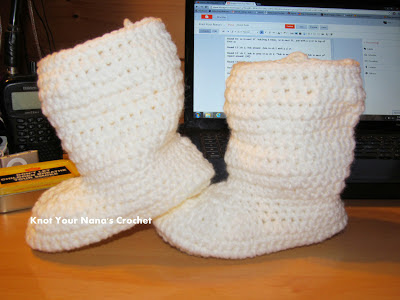
Slouch Boots - 2-3 years
This picture shows the slouch a little better.
I am not quite finished with these, I am planning on adding a strap to the front with a button. Just haven't had time to buy them yet. The idea for them actually came to me one night when I was trying to sleep. If you want to see the look I was going for the closest picture I could find was this one http://pinterest.com/pin/189995678001399383/. I wish I had of done the sole a different colour now. Maybe on the next pair.
This pattern has not been tested
NOTE: My patterns are free and I would like them to stay that way. You are free to print them out and pass them around but please make sure my blog address is somewhere on the pattern (http://knotyournanascrochet.blogspot.co.nz/) so that people know where the pattern originated.
Please do not sell my patterns or say they are your own. You are free to do whatever you want with the finished item. If you are selling them online please link back the pattern and give me credit. I took the time to write this pattern out so the least you can do is take the small amount of time it takes to give me credit.
Materials
4 mm hook
10 ply Yarn - I used Moda Vera Baby 10 ply
Scissors
Yarn needle
Tape Measure
10 ply Yarn - I used Moda Vera Baby 10 ply
Scissors
Yarn needle
Tape Measure
2-3 years - fits 15 cm foot
Pattern
DO NOT JOIN, MARK EACH ROUND WITH A STITCH MARKER.
Round 1: Ch 16, work 2 sc into the 2nd chain from the hook. Sc in next 9 stitches. Hdc 3, 2 dc in next. 6 dc in last ch. Now working along the other side of the chain. 2 dc in next stitch, hdc in next 3. Sc in next 9 stitches. 2 sc into the last ch. (38 stitches)
Round 2: 2 hdc into the first stitch, 2 hdc into next stitch, hdc in next 13. 2 hdc in next stitch, hdc in next, 2 hdc in next 4 stitches. hdc in next stitch, 2 hdc in next. hdc in next 13. 2 sc into each of the last 2 stitches.. (48 sts)
Round 3: sc in next 2 stitches, 2 sc into the next stitch. hdc in next 18 stitches. Put 2 sc into the next 2 stitches. sc in the next 2 stitches. Put 2 sc into the next 2 stitches. hdc in the next 18 stitches. 2 sc into the next stitch. Sc in next 2 stitches. (54)
Sides:
Round 4: Join to first sc with a sl st, working in back loop only. Ch 1, sc in each stitch around. (54)
Now back working in both loops,
Round 6: ch 1, Sc around. join to first sc with a sl st (54)
Round 7: ch 2, hdc around, join to ch 2 with a sl st. (54)
Round 8: ch 1, Sc in same stitch as ch 1, sc2tog, sc in next 14. Hdc in next stitch,
dc2tog 10 times. Hdc in next stitch, sc in next 15. Join to top of first sc with a slip stitch. Ch 1. (44)
Round 9: sc, sc2tog, Sc in next 14, hdc in next st dc2tog 6 times,hdc in next st, sc in next 11, Join first sc with a slip stitch (34)
Round 10: sc in next 17. hdc2tog 3 times, sc in next 11, join with a sl st to top of first sc (31 sc)
Round 11: ch 2, hdc in same stitch as ch 2, hdc around. Join to ch 2 with a sl st. (32 hdc)
Round 12: ch 2, hdc in same st as ch 2, *hdc in next 3 stitches, 2 hdc in next st* repeat around. (42)
Round 13: ch 2, hdc around. (42)
Round 14: ch 2, *hdc2tog, hdc in next 3 st* repeat around. Ending with a single hdc (34)
Round 15: ch 2, hdc around (34)
16-18: Repeat rounds 12-15
19: sc around
Finish off, weave in ends.
Finish off, weave in ends.
Thursday, 8 March 2012
Crochet Sandals
Now first off I would like to say that I am unsure what age child these would fit, they work out to be about a child/toddler size 8NZ/ 11US/ 28 Euro/ 10 UK, 6 ¾ inches, 17cm from heel to toe.
A great sizing chart can be found here http://www.zappos.com/measure-your-shoe-size. A few women I talked to said there three year olds wore a size US11 shoe but this will obviously vary from child to child. If you know the foot measurement here is a great tutorial/pattern for making the sole. http://www.chocolatemintsinajar.com/craft/2010/08/how-to-open-toe-crochet-sandals-for-any-size/
This is what I based my sole off http://hodgepodgecrochet.wordpress.com/2012/02/23/simple-toddler-slippers/. Have a look and while you are there take a look at the rest of her blog. Some great free patterns to be found.
Stitches used:
dc: Double Crochet
trc: Triple Crochet
sc: Single Crochet
American terms
So to start the pattern:
I used a 5mm hook and dk yarn
Sole - Make 4 (2 for each sandal)
Round 1: Ch 20, dc in 3rd ch from the hook, 15 dc, trc in next st, 2 trc in next st, 10 trc in end chain. Working other side of foundation ch. 2 trc in next st, 1 trc in next st, 15 dc, 2 dc in last st
Round 2: 2 dc in first dc of last round, 19 dc, 2dc in nxt, 1 dc, 2dc next, 1 dc, 2 dc nxt, 21 dc, 2 dc nxt x 3.
Round 3. sc around 53, Sl st into nxt st finish off
To join soles together:
With contrasting colour (cc) Sl St around to join the two soles together. I started at the heel as the join will be covered when the back of the sandal is sewed on. I also inserted a piece of cardboard between the two soles to make it less flimsy. Thinking now plastic may be better as you will be able to wash them. Something like an icecream container would work well for this.
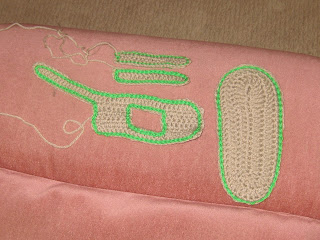
Front Straps (make 4):
I changed to a 4mm hook here
Ch 20, dc in 3rd ch from hook, dc across. Finish off.
With contrasting colour sl st around
Back Strap (right shoe):
Ch 2 counts as a dc
Row 1: Ch 45, 43 dc across (44 dc) ch 2, turn
Row 2: 7 dc across, (8dc) ch 2, turn
Row 3: 7 dc across, (8dc) finish off.
Row 2: Other side,
With right side facing you, count 16 st to the right, attach yarn, ch 2, 7 dc (8dc) Ch 2, turn.
Row 3: 7 dc (8dc) ch 1, turn.
Row 4: 8 sc across, ch 8, join to other side with a sl st, 8 sc. Ch 2, turn.
Row 5. 8 dc, 8 dc over chain, 8 dc, (24 dc) finish off leaving a tail long enough for sewing onto sole
With cc, sl st around outside and around the back opening.
Back Strap (left shoe)
Row 1: Ch 45, 43 dc across (44 dc) Finish off.
Row 2: With wrong side facing. Count 20 from right end of work, attach yarn, ch2, 7 dc (8dc) ch 2, turn
Row 3: 7 dc (8dc) finish off
Row 2: Other side
Attach Yarn to short end of strap. Ch 2, 7 dc. (8dc). ch2 turn.
Row 3: 7 dc (8dc) Ch 1, turn.
Row 4: 8 sc, ch 8, join to other side with a sl st, 8 sc, ch 2, turn.
Row 5. 8 dc, 8 dc over chain, 8 dc, (24 dc) finish off leaving a tail long enough for sewing onto sole
When sewing back strap to sole ensure the strap joins (where button goes) on the outside of the shoe.
Sew front straps onto the shoes
Add buttons to secure strap.
And you're done.
The front staps can be done in a variety of ways, one thick strap or you could make 4 straps for each shoe and overlap them, joining with a button. This would make the front straps adjustable to different width feet.
Saturday, 3 March 2012
turtle bobble square chart
To follow the chart start in the bottom right corner. Grey squares are bobbles.
Sc Crochet block done with a 4.5mm hook and dk yarn measurements are:
Width: 7.5 inches
Length: 8 Inches
29 sc across and 32 rows high.
Note: These measurements were taken from the flower bobble square so are just an estimate. This chart has not been tested. Please add finished pictures to Ravelry or send me a photo at kuddlynkute@gmail.com
Special stitches – 5 DC Bobble (B)
Instructions for the Bobble Stitch:
Bobbles are worked on wrong side rows.
Row 1 (RS): Ch 30, sc in 2nd ch from the hook, sc across remaining stitches (29 sc). Ch 1, turn.
Follow chart for remaining rows. 2-32
Sorry about the turle being so close to the edge, turtles seem to be longer than they are tall :)
Subscribe to:
Posts
(
Atom
)


