
Modified Pineapple Stitch Beanie


Materials:
Size 7 (4.5mm) crochet hook or whatever you have
DK, 8ply Yarn or whatever you have
Yarn needle
Scissors
Sizing:
Any as we will be working on measurements J
Note:
This hat is worked in the round. The first Ch 2 of each round counts as the first hdc. Make sure to join each round with a sl st in the top of the first Ch 2. A video for the magic loop method can be found here: http://www.craftyminx.com/2011/10/crochet-school-lesson-16-working-in-the-round-1.html.
Here is a chart with measurements. You should increase until the Circumference is the same measurement as the size you are aiming for.
Hat height with brim allows the hat to be turned up about 1”
Hat circ should be 1 to 1 ½” smaller than the head circ
Hat Sizing Chart | ||||
Age/weight | Head Circ | Hat Circ | Hat height allowing for brim to be turned up. | Hat height without fold over brim. |
1-2 Ibs (1kg) | 9" - 10" 23-25cm | 7.5" -8" 18-20 cm | 3.5 - 4" 10cm | 2.5 – 3” |
2-3 Ibs (1.4kgs) | 10" - 11 1/4" 25-28 cm | 8.5" - 10" 22-25 cm | 4" 10 cm | 3” |
4 - 5 lbs 2 kg | 11 1/2" - 12 1/2" 28-33 cm | 9" - 11.5" 23-28 cm | 4 to 4.5" 10-11cm | 3” – 3.5” |
5 ½ - 6 lbs 2.7 kg | 12 1/2" - 13" 31-33 cm | 11" - 12" 28-33 cm | 5 to 5.5" 13-15 cm | 4 – 4.5” |
Newborn | 13" - 14 " 33-36cm | 11.5" - 13" | 5.5 to 6" 13-15 cm | 4.5” - 6” |
3-6 months | 14" - 17 " 36-43 cm | 12.5” – 16” | 6.5 - 7" 15-18 cm | 5.5 – 6” |
6-12 months | 16" - 19 " 41-48 cm | 14.5 – 18” | 7.5" 18 cm | 6.5” |
12 months – 3 years | 18" to 20 " 46 -48 cm | 16.5” – 19” | 8” 20cm | 7” |
3-10 years | 19" - 20 1/2" 48-51 cm | 17.5 – 19.5” | 8.5" 22cm | 7.5” |
Pre-teen - teen | 20 1/2" - 22" 53 -56 cm | 19 – 21” | 9-10" 25 cm | 8 – 9” |
Adult Woman | 21.5" - 22.5" | 20” – 21.5” | 11" | 9" |
Adult Man | 23" - 24" 58.4 cm - 61 cm | 21.5” – 23” | 11"-11.5" | 9.5" – 10.5” |
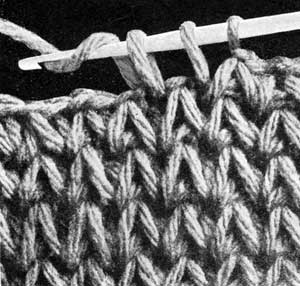
Modified Pineapple Stitch (MPS) – Draw yarn through same sp as the last stitch in the previous cluster, draw through next 2 st, pull through all 4 loops on hook, chain 1 to close cluster.
Basically it is a 3sctog but the first loop is pulled through the same stitch as the last stitch in the previous cluster. The picture below shows the antique pineapple stitch, what we are doing differently is we are not missing a stitch but going into the stitch on top of the “V” in the picture (in between the last loop and middle loop). This will give it a "W" look instead.
Picture was found here http://www.freevintagecrochet.com/how-to-crochet/pineapple-stitch
Source: Woolco Knitting & Crocheting Manual
Source: Woolco Knitting & Crocheting Manual
These are the circumferences I ended up with using a 4.5mm hook and DK yarn
Starting with 10 hdc
Round 3 = 7” 18cm
Round 4 = 10” 25.5cm
Round 5 = 12.5” 32cm
Round 6 = 14.5 37cm
Round 7 = 16.5 42cm
Increases about 2” each round
Starting with 12 hdc
Round 3 = 8.5” 22cm
Round 4 = 11” 28cm
Round 5 = 13.5” 35.5cm
Round 6 = 16” 41cm
Round 7= 18.5’ 47 cm
So each round is increasing 2.5”
Above is an example of how changing the number of st you start with can adjust the size of your increase circle.
Obviously if you are using yarn with a different weight or a different hook size your measurements will be different. Changing hook size can help with getting the correct size increase circle for the top of hat. Because everyone crochets with a different tension your measurements may end up being way off. That is why I have suggested using measurements rather than following an exact pattern.
A good tutorial for hat sizes can be found here:
Crochet a Basic Crown for a Beanie / hat Tutorial
http://www.youtube.com/watch?src_vid=I2kuMfmJHOc&feature=iv&v=sEwo1d8qGpo&annotation_id=annotation_748342
Crochet Beanie/Hat - Getting it to fit - Do's and Dont's
https://www.youtube.com/watch?v=I2kuMfmJHOc
Right lets start the pattern. You will stop when you feel your beanie is at the right circumference for the size you are making. A good tip is to measure each round. The MPS needs an even number of st to work.
Increase Rounds
Make a circle using the magic loop method or alternatively Ch 4 and join with a sl st in the first chain which will make a circle.
Round 1: Ch 2, (5, 7, 9,11 hdc in circle. (6, 8, 10, 12 hdc)
Round 2: Ch 2, 2 hdc in each st around. (12, 16, 20, 24 hdc)
Round 3: Ch 2, 2 hdc in next st, *Hdc in next st, 2 hdc in next* around.
Round 4: Ch 2, hdc in next st, 2 hdc in next st, *hdc in next 2 sts, 2 hdc in next st* around.
Round 5: Ch 2, hdc in next 2 sts, 2 hdc in next st, *hdc in next 3 sts, 2 hdc in next st*around.)
Round 6: Ch 2, hdc in next 3 sts, 2 hdc in next st, *hdc in next 4 sts, 2 hdc in next st* around.
Round 7: Ch 2, hdc in next 4 sts, 2 hdc in next st, * hdc in next 5 sts, 2 hdc in next st* around.
Round 8: Ch 2, hdc in next 5 sts, 2 hdc in next st, * hdc in next 6 sts, 2 hdc in next st* around.
Keep increasing until it is the correct size for the hat you intend to make, I am sure you should have the pattern by now.
MPS rounds
1. To begin. Ch 1, Draw loop up through same sp as ch1, pull loop through next 2 st, draw yarn through all 4 loops on hook.
*Draw yarn through same sp as the last stitch in the previous cluster, draw through next 2 st, pull through all 4 loops on hook, chain 1 to close cluster.* Repeat until round is completed. Join with sl st in first stitch of round.
Start at 1 again.
Please let me know if you are having touble with this.
You will know if you have done something wrong as the MPS’s won’t line up.
Continue until piece is 1 ½ - 2 inches from the hat height without brim measurement for the size you are making. So for example you are making newborn size. You will to MPS rows until hat measures 3 - 4.5” from the crown of the hat (where you did your magic circle)
Hat brim
This can be done 2 different ways.
1. You can hdc 5-6 rows around or until hat measures the hat height without brim measurement for the size you are making. So for example a newborn hat you would hdc around until the hat measures 4.5” - 6” from the crown of the hat (where you did your magic circle)
2. You can add a flap which you can button down after (see photos). To do this finish off after your MPS rows. Lay hat flat with the joining seam down the side of the hat, attach yarn about 3 inches from the right side of the hat (really comes down to personal preference, Ch until the flap is the length you want it. Ch another 2. Hdc in the 3rd ch from the hook, hdc around until you reach the beginning. Instead of joining ch1, turn. Continue doing this until hat measures the hat height without brim measurement for the size you are making. So for example a newborn hat you would hdc rows until the hat measures 4.5” - 6” from the crown of the hat (where you did your magic circle).
Now you can add buttons, a great tutorial for making buttons holes can be found here (yes it is a diaper cover but Clare does and awesome job of explaining how to do it) https://www.youtube.com/watch?v=9eRaGsoScnw&feature=relmfu you will find it at about 12.30mins. So basically you would do this along the side of the flap part. Then just sew on your buttons and weave in your ends and your done! Easy as that.
Another option is just to sew the buttons though the flap and onto the hat as it is not like you will undo the buttons at all it is just for looks.
I hope it makes sense. I tried to make it so everyone would understand including beginners but I may have written too much for those that have been crocheting for awhile.
I'm just about to try this pattern. You've gone to a lot of trouble writing all these instructions down .... Thank you so much for your hard work!!
ReplyDeletetotally lost doesn't make since to me...do a half double yarn over draw thru 2 loops then u have 2 loops left then u said draw thru 4?????
ReplyDeleteHi there,
DeleteIf you look at the picture above you should be able to get a better idea on how to work the stitch. You are going into 3 stitches and pulling up loops. So you will start with one loop on the hook, go into the same stitch as end of previous cluster or ch 1 space if you are beginning the row. Then you will want to go into the next 2 stitches and pull up loops. You will now have four loops on your hook. Pull through all these and then ch 1 to close the cluster.
I used your pattern, as basis for a hat I just finished, once I figured the ch you use to close the MPS's was one of the two stitches you needed to pull up from, It was a breeze. Love your pattern and your pictures are adorable! :) Congrats on a great site
ReplyDeleteDi
So confused. The beginning you say make a magic circle with magic loop or chain 4 and attatch... so ive made the magic loop the very first bit but am i supose to do something else before starting round 1, because if i go straight into round 1 there's obviously a lot less material from just the loop compared to if you have a circle made of four chains...??
ReplyDeleteI also don't understand where you've put each round you say chain 2 then you have 5 7 9 11 and i just don't understand what this is representing or anything. Im very new to this and this probably makes sense to everyone else but are you at all able to upload a video that talks through the instructions?
I am wanting to make this hat to fit 5.5 to 6 lbs. I am familiar with crocheting but i am having trouble know how to make this. I am making this for the hospital
ReplyDelete