NOTE: My patterns are free and I would like them to stay that way. You are free to print them out and pass them around but please make sure my blog address is somewhere on the pattern (http://knotyournanascrochet.blogspot.co.nz/) so that people know where the pattern originated.
Please do not sell my patterns or say they are your own. You are free to do whatever you want with the finished item. If you are selling them online please link back the pattern and give me credit. I took the time to write this pattern out so the least you can do is take the small amount of time it takes to give me credit.
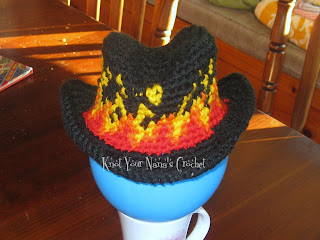
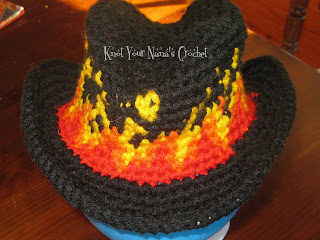
I am not sure if this is a first or not but I have never seen another one like it. Thanks to one of my wonderful customers for the idea. My facebook page can be found here if anyone is interested Knot Your Nana's Crochet. Keep in mind I am in New Zealand but can post to other countries.
I didn't write out a pattern for this but here is the basics of how it was made. Any intermediate crocheter should be able to follow this to make their own.
Supplies
Black - 100 grams DK 8 Ply
Small amount of red, orange and yellow. I would say less than 50 grams of each. DK 8 Ply
4.5mm hook
Speaker Wire
Scissors
Yarn Needle
Stitch marker
Optional - Balloon for head size
Bobwilson123's video tutorial for hat can be found here http://www.youtube.com/watch?v=nuT1MWgBQOU there are three parts. I suggest you watch them before crocheting the hat to get an idea of what you are doing. It makes it easier in the long run.
Basics of making a Cowboy hat
USE TWO STRANDS OF DK
1. Crochet an oval about 1 inch smaller than your head circumference. If you don't know how to crochet an oval here is a good link that shows a picture to go with Bobwilson123's tutorial. My hat fits a 47cm head and I ended up with 60 stitches around (this is important when it comes to the chart). I blow up a balloon and keep trying it on as I go. But you won't really know until you have done some of the down rows. I worked in the round rather than joining but you can do what method suits you. If you work in the round be sure to mark the start with a stitch marker.
2. Start on your down rows which all you have to do is sc around without increasing. If you find your hat isn't turning down fast enough try going down a hook size. I did about 3 rows before starting on the intarsia chart. The intarsia chart here is written for multiples of 15 but it can probably be adjusted by adding black in between the flames to increase the hat size or even decrease.
Remember to start at the top of the chart and work your way around. Start from the left and repeat that row the amount of times you need. I did it four times before starting on the next row. White = Black in my picture. I also did a solid row of red around the bottom. If you are unsure how to do intarsia look up videos on youtube before you start. This was my first project using it and it is easier than you would think. Make sure to carry the yarn behind your work (crochet over it).
3. Start on the brim.
Row 1: *sc in next 2 stitches, 2 sc in next stitch* Repeat around.
Row 2: sc around
Repeat these rows until you are one row short of the length you would like the brim. If you end and the next row is a increase row just ignore that.
To finish the brim sc over top of your wire. The last video in Bobwilson123's tutorial shows you how to do this.
To finish the hat and to help it hold its shape you could starch it or spray it with water, shape it and let it dry but I found mine holds its shape pretty well without doing that.
If you try this please share pictures and if you need any help just ask.


This is really great! Thanks for sharing, I cannot wait to get started.
ReplyDeleteWOW! This is really an amazing and attractive post .I cannot wait to get started. I appreciate your posted wonderful photos. Thanks for sharing such an interesting post. Redneck Beer Hat
ReplyDeleteThis looks great - I'm going to use it in a scarf I'm planning and will put pictures on rav.
ReplyDelete